Quantcast
Channel: magento – NWDthemes.com
Viewing all 53 articles
Browse latest View live

How to install Slider Revolution Magento 2 extension

$
0
0

In this guide you will learn how to install Slider Revolution Magento 2 extension. For this operation we will need our extension package and shell access to server with your Magento 2 installation.

First you need to upload extension files to the root of your Magento 2 e-commerce installation. Once uploaded you will see extension files are located at /app/code/Nwdthemes/Revslider folder.

Next let’s do some Magento 2 shell command magic. If need more details on those commands you can always check detailed cheat sheet of Magento 2 shell commands.

And here we go:

1. Install extension module:

php /magento2path/bin/magento setup:upgrade

2. If you are in production mode (compilation enabled) need to run compilation:

php /magento2path/bin/magento setup:di:compile

3. Deploy static content:

php /magento2path/bin/magento setup:static-content:deploy

4. Clean cache

php /magento2path/bin/magento cache:clean

Tada! Now Slider Revolution module is available in your Magento 2 backend.

Thanks for reading our guide. Now you know how to install Slider Revolution Magento 2 extension. You can also learn how to uninstall Magento 2 extension. Just kidding. You do not want to uninstall this one 🙂

The post How to install Slider Revolution Magento 2 extension appeared first on NWDthemes.com.


Magento 2 : How to diagnose errors

$
0
0

Magento 2 development could raise a lot of questions. And if you see blank screen you and don’t know how to diagnose error this article is definitely for you. Basically there are 3 variants of errors:

There has been an error processing your request

There has been an error processing your request
Exception printing is disabled by default for security reasons.
Error log record number: XXXXXXXXXXXX

It means that Magento 2 runs in default or production mode. You wont see the actual error message on the screen, only error report ID. Errors are logged to the file system and are never displayed to the user. Detailed error report could be found in the var/reports folder.

More about error reporting in Magento 2

Magento 2 interface does not respond to any actions

It means you have javascript error. You need to check browser developer console for error message. Chrome console can be shown by pressing F12.
developer console
More about Chrome developer console

You see blank screen

It could be either javascript or server error. You check if it is javascript error by checking browser developer console. For server error you can do :

– enable display_errors from app/bootstrap.php file line 11 – remove # from starting.
– check that error_reporting from app/bootstrap.php file line 10 set to E_ALL
– switch magento 2 to developer mode
– check error logs in var/log folder ( var/log/exception.log )

You might be also interested in

Magento 2 Setup Compile Errors
Magento 2 Command-Line Interface (CLI) Commands List

The post Magento 2 : How to diagnose errors appeared first on NWDthemes.com.

Magento 2 : Load Model Data By Custom Field

$
0
0

Magento 2 developments involve strong usage of models concept. Usually magento models loaded by primary field. However, if you need to load it using non-primary unique field there are several methods to do it. To illustrate examples below lets assume that we have created tables sliders with primary index slider_id and unique index alias. Model, ResourceModel, Collection classes also created.

Load Model via Collection

Inject the factory class in your constructor using dependency injection:

/**
 * @var \Company\Module\Model\SliderFactory
 */
protected $sliderFactory;

/**
 ...
 * @param \Company\Module\Model\SliderFactory $sliderFactory
 ...
 */
public function __construct(
	...
	\Company\Module\Model\SliderFactory $sliderFactory,
	...
)
{
	parent::__construct(...);
	$this->sliderFactory = $sliderFactory;
}

And then you can use factory to get collection:

$banners = $this->sliderFactory->create()
	->getCollection()
	->addFieldToFilter('alias', $alias)

Load Model using load method

Inject the factory class in your constructor using dependency injection as we did with collections. After that create slider model using factory and execute load method:

$slider = $this->sliderFactory->create();
$slider->load($alias,'alias');
if(!$slider->getId()){
    echo "not found";
}

However, if you do check abstract model class Magento\Framework\Model\AbstractModel you will see that load and save methods are deprecated. Of course you can use resource model directly.

$slider = $this->sliderFactory->create();
$slider->getResource()
	->load($slider, $alias, 'alias');

But this solution also has some drawbacks. The main reason is model load method contain important code that initiate model load before/after events, see Magento\Framework\Model\AbstractModel :

public function load($modelId, $field = null)
{
    $this->_beforeLoad($modelId, $field);
    $this->_getResource()->load($this, $modelId, $field);
    $this->_afterLoad();
    $this->setOrigData();
    $this->_hasDataChanges = false;
    $this->updateStoredData();
    return $this;
}

Be aware of the following caveats:

  • _beforeLoad is not called: model_load_before and $this->_eventPrefix . '_load_before' events are not dispatched via eventManager.
  • _afterLoad is not called: model_load_after and $this->_eventPrefix . '_load_after' events are not dispatched via eventManager.
  • updateStoredDatais not called: object’s stored data and the actual data are not synchronized.

The post Magento 2 : Load Model Data By Custom Field appeared first on NWDthemes.com.

Update of Magento Slider Revolution 5.4.6.3: Magento 2.2 Compatibility, New Feature and Bugfixes

$
0
0

Yesterday, 22nd of November 2017 — we have released the new version 5.4.6.3 of Magento 1 and Magento 2 Slider Revolution Extension. In this update of Magento Slider Revolution we resolved compatibility issues with new 2.2+ versions of Magento 2 platform, added new feature and of cause patches & fixes for bugs we have done in previous update.

Compatibility

New update makes it really stable and smooth with new Magento 2.2 and there is no compilation errors or javascript errors in backend that was making you sad in previous version. We strongly recommend to upgrade to this one if you are using Magento 2.2.0 and higher.

New Feature

As per multiple requests from our valuable customers we have added Access Permissions controls for slider. Now you can restrict or allow access to your sliders for different customers group or not logged in customers. This feature is available in Slider Settings page under Access Permissions section:

This feature will be useful if you have sliders with offers available for different groups of customers. Or if you are using slider to create instructions or tutorials that can vary depending of customer account type.

Don’t hesitate to contact us you have your own genius or crazy feature request for Magento Slider Revolution extension. Maybe your feature will appear in next update. Try it! You never know, you might be lucky.

Change Log

And here is the complete list of changes in 5.4.6.3 update of Magento Slider Revolution:

New Features:

  • Added slider Access Permissions by Customer User Group options to Slider Settings

Changes:

  • Added “playsinline” support for Safari 11 video

Bugfixes:

  • Fixed Instagram API issue
  • Fixed Vimeo autoplay issue
  • Fixed muted YouTube playing brief sound issue
  • Fixed javascript error in import slider dialog

Magento 1 Bugfixes:

  • Fixed problem with caching and ssl connection on some server configurations
  • Fixed javascript error in import slider dialog

Magento 2 Bugfixes:

  • Fixed add slide to user templates feature
  • Fixed preview of uploaded slide thumbnail image
  • Fixed import slide from template in slide editor
  • Fixed backend JavaScript errors in production mode
  • Fixed backend JavaScript errors in Merge with Bundling JavaScript mode
  • Fixed insert image from Image Gallery feature
  • Fixed DOM validation exception in slider widget
  • Fixed bug in slider import and other places where std class was missing namespace

Stay tuned for next updates and have a huge success in upcoming Black Friday sale!

The post Update of Magento Slider Revolution 5.4.6.3: Magento 2.2 Compatibility, New Feature and Bugfixes appeared first on NWDthemes.com.

Slider Revolution: How to add slider to a category in Magento 2

$
0
0

Slider Revolution gives you ability to create attractive content for any page in magento 2. It can be used in cms pages, category listings, product pages etc. You have several ways of intergration including shortcode for cms pages/blocks, xml code for layout files and plain php. Today we will learn how to add slider to a category in Magento 2

How to add slider to a category in Magento 2

1. Login to admin.

2. Navigate to NWDthemes > Slider Overview and create new slider. You can import ready-to-go template from our Slider Templates Library which gives you wide variaty of templates to choose from.

3. Open “Embed Slider” popup from slider dropdown and copy code for xml layout. We will need it later.

4. Navigate to Catalog > Categories and select category you will be working with.

5. Open Design section and insert the code you copied earlier into Layout Update XML field. Wrap it in referenceContainer node.

If you want to have slider below main navigation, use referenceContainer name=”page.top”

<referenceContainer name="page.top">
<block class="Nwdthemes\Revslider\Block\Revslider">
    <arguments>
        <argument name="alias" xsi:type="string">classicslider</argument>
    </arguments>
</block>
</referenceContainer>

If you want to have slider in main content area, use referenceContainer name=”content.top”

<referenceContainer name="content.top">
<block class="Nwdthemes\Revslider\Block\Revslider">
    <arguments>
        <argument name="alias" xsi:type="string">classicslider</argument>
    </arguments>
</block>
</referenceContainer>

Do not just copy the code. You should use your own slider alias.

7. Navigate to System > Cache Management and clear the cache.

8. Check your beautufil slider on frontend!

Summary

Adding custom slider to category page is pretty easy task. Basically each category can have its own slider. Possible caveats are:

  • Cache issues: if you are using Varnish or Redis you will also need Flush Cache
  • If you disable Include RevSlider libraries globally option In Global Settings, you will need to add category page handle to list of handles in Pages to include RevSlider libraries option. It can look like this cms_index_index,cms_page_view,catalog_category_view

You might be also interested in how to add a slider to category in magento 1

The post Slider Revolution: How to add slider to a category in Magento 2 appeared first on NWDthemes.com.

Magento 2 Bundle and Merge JavaScript Modes — Why Better To Enable Separately

$
0
0

Magento 2 Bundle and Merge JavaScript Modes can improve performance of your eCommerce website dramatically. But should you enable them simultaneously or separately?

While supporting our Slider Revolution Extension for Magento 2 we found JavaScript error on clients website. This problem was related to both merge and bundle javascript options enabled. In this configuration slider scripts can work unstable as it can break Require.js loaded dependencies. And as Magento 2 developers shared it is not recommended to enable both merge and bundle options same time. As they are pointed to optimize scripts loading in different way and purpose working together they can decrease positive performance effect of each other and cause problem with scripts on complicated apps. So we recommend to keep only merge or bundle modes enabled depending which one gives you better improvements but not both at the same time. Now we have disabled bundling and leave merge enabled and slider works on both front and backend.

In recent discussion with Magento team front end developers they explained that Bundle is used to optimize loading of dynamic required scripts that use Require.js. And merge option is used to speed up loading of old way embedded scripts. When both Magento 2 Bundle and Merge modes are enabled it can lead to unstable work and decrease effect of each separate mode. In future they are going to restrict enabling of both conflicted modes same time so it is advised not to use them together.

It is not recommended to turn all of the JS tweaks at once. As some of them are targeted to different aspects of optimization enabling both can bring in instability and decrease of performance instead of performance increase. This is about Merge and Bundle mode. Discussed with Magento developers they share that enabling of this options same time will be deprecated and disabled in future. So you need to consider enabling Merge or Bundle mode not both of them at once.

The post Magento 2 Bundle and Merge JavaScript Modes — Why Better To Enable Separately appeared first on NWDthemes.com.

Magento 2 : Product image size and other options

$
0
0

Magento 2 product image size and other image options are defined in <theme_dir>/etc/view.xml. Themes located in app/design/frontend/<Vendor>/ folder. But magento built-in themes can be located in vendor/magento/theme-frontend-<theme_code> when you install it from the composer repository. /etc/view.xml contains images configuration for all storefront product images and thumbnails. This file is required for a theme, but optional if exists in the parent theme. If your theme does not have /etc/view.xml, you can check parent theme. Parent theme is declared in <theme_dir>/theme.xml. Here is sample code from Luma theme:

<theme xmlns:xsi="http://www.w3.org/2001/XMLSchema-instance" xsi:noNamespaceSchemaLocation="urn:magento:framework:Config/etc/theme.xsd">
    <title>Magento Luma</title>
    <parent>Magento/blank</parent>
    <media>
        <preview_image>media/preview.jpg</preview_image>
    </media>
</theme>

Image configuration located under <images module="Magento_Catalog"> node. Typically it looks like this:

<images module="Magento_Catalog">
	<image id="image_location_id" type="image_type">
		<width>140</width>
		<height>140</height>
		...
	</image>
</images>

id is inuque parameter that used in .phtml templates to specify image properties for particular location on a particular page. It could be related product image on product details page, product image for list / grid catalog listing, wishlist product images on category listing, product image in cart popup, product image on cart page and so on.

type – define what image will be displayed. Image roles assinged in magento admin Catalog > Products in “Images and Videos” section. Each role can have its own image, it allows to load different images for small thumbnail or for big image. Allowed values:

  • image – corresponds to the Base Image role
  • small_image – corresponds to the Small Image role
  • swatch_image – corresponds to the Swatch Image role
  • swatch_thumb – corresponds to the Swatch Image role
  • thumbnail – corresponds to the Thumbnail Image role

In case of changing/overwriting the values of the view.xml file you need to completely copy the entire view.xml file to your custom theme and change the values.

view.xml does not have a node value fallback system, means if a value of a node is not present in you custom theme’s view.xml it will not fallback to its parent theme’s view.xml value, that’s why entire file needs to be copied.

How to change product image dimensions

To change product image dimensions in magento 2 open <theme_dir>/etc/view.xml, find image with correct ID and update widht/height parameters. We will update image size on products grid page. According to listing template image ID = category_page_grid. Lets update magento 2 product image size to 240×180.

<image id="category_page_grid" type="small_image">
	<width>240</width>
	<height>180</height>
</image>

Complete list of image parameters

Magento can resize images, keep aspect ratio, keep images transparent, crop product images. Please check complete list of parameters below.

width – Image width in pixels. Use it to change product image size.
Type: integer
Default value: none

height – Image height in pixels. Use it to change product image size.
Type: integer
Default value: none

constrain – If the “constrain” parameter is set to true, the images which are smaller than specified value will be not enlarged by Magento. Only frame border of such images will increase. Constrain can be used with small product images if you do not want Magento to resize and pixelate them. Has no effect on images with dimensions bigger than specified in width/height parameters.
Type: boolean
Default value: true

aspect_ratio – If set to true, proportional relationship between its width and its height stay consistent.
Type: boolean
Default value: true

frame – If set to true, guarantees that the image will be not cropped. Applied only if aspect_ratio is set to true.
Type: boolean
Default value: true

transparency – If set to true, the transparent background of images is saved. If is set to false, images have the white background (by default). You can set the color for the background using the background parameter.
Type: boolean
Default value: true

background – The color for the images background. Not applied to images with transparency, if transparency is set to true. Use it to remove white image frame upon resizing photos and adjust background color to your theme.
Type: string
Default value: [255, 255, 255]

Apply changes

When you’re done editing view.xml and update your magento 2 product image size you need to tell magento to re-generate product images. It can be done via ssh console command.

php magento catalog:images:resize
php magento cache:clean

More about magento console commands here – Magento 2 Command-Line Interface

Code Samples

Image ID could be used in .phtml template like this:

<?php
/**
 * @var $block \Magento\Catalog\Block\Product\Widget\NewWidget
 */
$image = 'new_products_content_widget_grid';
$items = $block->getProductCollection()->getItems();
foreach ($items as $_item) {
    echo $block->getImage($_item, $image)->toHtml();
}

You can set custom dimensions directly in template file:

<?php
/**
 * @var $block \Magento\Catalog\Block\Product\Widget\NewWidget
 */
$image = 'new_products_content_widget_grid';
$items = $block->getProductCollection()->getItems();
$width = 100;
$height = 100;
foreach ($items as $_item) {
    $resizedUrl = $block->resizeImage($_item, $image , $width, $height)->getUrl();
    echo '<img src="'.$resizedUrl .'" alt="alt text" />';
}

You can modify other image options in template file. In order to do it in you need to inject image helper class ( \Magento\Catalog\Helper\Image ) in your block class.

<?php
/**
 * @var $block \Magento\Catalog\Block\Product\Widget\NewWidget
 * @var $imageHelper \Magento\Catalog\Helper\Image
 */
$image = 'new_products_content_widget_grid';
$items = $block->getProductCollection()->getItems();
$width = 100;
$height = 100;
foreach ($items as $_item) {
    $resizedUrl = $imageHelper->init($_item, $image )
        ->keepAspectRatio(TRUE)
        ->constrainOnly(TRUE)
        ->keepFrame(TRUE)
        ->resize($width, $height)
        ->getUrl();
    echo '<img src="'.$resizedUrl .'" alt="alt text" />';
}

Helpful Links

Magento theme structure
Images properties for a theme

The post Magento 2 : Product image size and other options appeared first on NWDthemes.com.

Get Up to 40% Off in Spring

$
0
0

The time for huge discounts is coming! Envato launches an event that will be live between Thursday March 8 and Thursday March 15 (2pm – 2pm AEDT).

We are pleased to announce that NWDThemes team is in the game! We bring to your attention a list of time-tested and approved by many customers products that has been chosen specifically for this event.

Slider Revolution Responsive Magento Extension


Are you surprised? Yes! This famous extension that is used on more than 1 million websites all over the world is now available for only $23! With huge range of features and user-friendly interface it helps you to create a top-notch slider for your website just in a few clicks even if you are not tech-savvy.

The Revolution is here!

  • Responsive Layouts

    This extension is designed to work and look nice on any PC, tablet or mobile device and also has optimization for Android & Mac OS.

  • Drag & Drop Solution

    Managing sliders has never been easier! Even the beginner will be able to manage a great presentation with new, more intuitive workflow.

  • Multi-Media Support

    Regular Image Display with Bulk Upload option, HTML5, YouTube & Vimeo Videos support, Popular Social Media Content Stream.
    All this gives you the ability to create information rich slides that your website visitors and customers will be able to identify with.

Still have doubts? Check Slider Revolution page to learn more about many many other tasty features.

Responsive Magento Product Slider


“Product Slider” is another must have extension that allows you to add a slider of products wherever you need at your website. It’s available for $13.

Benefit from its features:

  • Responsive layout
  • Touch & swipe support
  • Available as a widget or shortcode
  • Different slider types: recently added products, most viewed products, new products, bestsellers
  • Control over every product element in your slider: show/hide title, price, rating, add to cart button, wishlist and compare links etc…

Full list of available features can be found at nwdthemes.com.

Wunderadmin – Magento Admin Theme


Tired of gloomy design working in Magento admin panel? “Wunderadmin” will let the sun shine in this realm of darkness! It’s a great solution that will be helpful to change the look and feel of your admin panel for only $22.

This extension includes:

  • 3 predefined modern skins
  • The ability to import/export color schemes
  • The ability to upload your custom logo
  • Options to apply any color using colorpicker
  • Options to set Google fonts

More info about this extension can be found at nwdthemes.com.

Ultratabs Magento Extension


Really? $11 for the ability to have full control over tabs on a product details page in Magento? Yes, that’s it! Many people rack their brains on how to add new, edit or remove default Magento tabs and there are tons of requests on different support or developer related forums on how to deal with it. The time has come to not miss a great all-in-one solution almost for free!

Just check what you get:

  • The ability to add unlimited custom tabs
  • The ability to hide default Magento tabs
  • The ability to change tabs order
  • Control over “Reviews” tab
  • Options to manage the look of tabs
  • The ability to assign tab to a product attribute

More info about this awesome extension can be found at nwdthemes.com.

Ajax Cart Magento Extension


Tiny but very useful solution for those who takes care of their customers and aimed to make their life much easier while they are browsing the catalog. This extension allows to add products to cart directly from a products listing page without leaving it that may also force to buy even more products than was planned. It’s available for only $22.

Some tasty features included:

  • Ajax wishlist
  • Ajax compare
  • “Quick View” popup
  • Support for all product types

Full list of available features can be found at nwdthemes.com.

The post Get Up to 40% Off in Spring appeared first on NWDthemes.com.


Creating Coupons in Magento 2 Has Been Never Easier

$
0
0

All of us at least once used coupons to discount from a store and you agree that it’s not bad to purchase some necessary or desired goods with much lower price. Every store owner who cares about sales should provide coupon codes from time to time. In most cases this forces customers to comeback again and make even more purchases than was planned.

With the release of Magento 2 – creating coupons has become easier than it’s ever been. Now anyone can manage a coupon in simple 6 steps:

  1. Navigate to Marketing -> Promotions -> Cart Price Rules section.
  2. Click the Add New Rules button.
  3. In the Rule Information section fill in all required fields. (See a screenshot below).
  4. Apply specific rule conditions or leave this section untouched to apply them for all products.
  5. Set the discount amount and additional actions if necessary.
  6. Finish managing the coupon code.

1. Cart Price Rules

If you used to work with Magento 1 before, you can remember its admin panel gloomy design and tons of same options that are not very intuitive. Without specific knowledge it was a nightmare to manage one or another section in your store sometimes. In Magento 2 the developers put their best to create as user-friendly admin panel as possible with a modern design. But the best benefit is that they have finally grouped all settings in sections that are now intuitive and easy to reach even if you never used Magento.


2. Add New Rule

On a “Cart Price Rules” page you can see a list of already created rules that can be used for testing purposes. You can also make some slight changes to fit your needs and apply them for your store or create new rules from the scratch.


3. Rule Information

Here you can set the the name of your coupon code promotion (1), select websites on which the coupon code will be applied (3) and define customer groups that can benefit from the discount (4). Set Coupon option (5) as “Specific Coupon” and apply the Coupon Code (6) that your customers will need to enter in cart to purchase products with a discount. If necessary you can also use some additional options such as: coupon code auto-generation, limit the number of uses per customer and set up the period when your coupon code is applicable.


4. Conditions

In this section you can set under what conditions the discount will be applied, so if you allow discount for all products just skip this section and leave it as it is.


5. Actions

Here you should choose whether the discount amount will be fixed or percent of product price. Then apply the Discount Amount (1). In addition you can also set other options from this section.


The post Creating Coupons in Magento 2 Has Been Never Easier appeared first on NWDthemes.com.

How to create a “Free Shipping” coupon in Magento 2

$
0
0

Previously we have published an article on “How to create coupon codes in Magento 2”. Today we are going to consider one of promotion programs for your customers that allows them to not pay any fee for your delivery.

In Magento 2 it’s possible to achieve this, either with, or without a coupon. Below are the steps required to setup a “Free Shipping” coupon code.

  1. Enable Free Shipping
  2. Set Cart Price Rules

1. Enable Free Shipping

By default Free Shipping is disabled in Magento and the first step will be to activate this method and apply settings to fit our needs most.

  • Navigate to Stores -> Settings -> Configuration (1) in your dashboard.


  • Switch to Sales tab and select Shipping Methods (2).


  • Browse the settings and apply them to fit your needs. To learn more about the free shipping settings please, refer to this tutorial.
  • After you’ve finished with free shipping settings, set Enabled option to “YES” (3).


2. Set Cart Price Rules

The next step is to setup the rule and apply a coupon code.

  • Navigate to Marketing -> Promotions -> Cart Price Rules in your dashboard.
  • Click the “Add New Rule” button on the top right.


  • In the Rule Information section:
    • Set the Rule Name (1) e.g. “Free Shipping” or any whatever you like.
    • Apply Websites (2) & Customer Groups (3).
    • Set Coupon (4) option as “Specific Coupon” and apply the Coupon Code.
    • (Other options are not mandatory and you can set them to your choice.)


  • In the Actions section:
    • Set Apply option to “Percent of product price discount” (5).
    • Set the Discount Amount (6).
    • Set Apply to Shipping Amount option to “YES” (7)
    • And apply Free Shipping option as “For matching items only” (8).


  • In the end you can also apply Default Rule for All Store Views or Store View Specific labels in Labels section. They will be further visible to the customer.
  • And the last step is to test the rule.

The post How to create a “Free Shipping” coupon in Magento 2 appeared first on NWDthemes.com.

How to Manage Custom Email Templates in Magento 2

$
0
0

Communicating with your customers is essential to smooth working of your online business. It’s a good practice for the store owner to notify them about different things like orders, subscriptions, promotions, invoices etc. This makes your clients trust your business and motivates them to return to your online store more and more.

When a customer places an order, it is an event that triggers many actions that follow. One of them is to notify your customer about the details of the order and payment confirmation. You also provide a timeline for the shipment and try to up-sell and cross-sell through email messages.

In Magento 2 it’s possible to manage email templates and set them to be sent automatically to your customers on some of triggered events. Today we will consider some steps to create custom email templates:

  1. Add new template
  2. Create custom template based on Magento default template
  3. Create custom template from the scratch
  4. Override default email templates in the theme
  5. Insert Variables*

1. Add custom template

Navigate to Marketing -> Email Templates (1) section in your Magento admin panel.


By default the list is empty and here we will add our first email template. At the top right click the “Add New Template” (2) button.


2. Create custom template based on Magento default template

In this section you can configure your custom template by overriding the default Magento email template with a bit tweaking.

This method is pretty simple and all we need in this case is to select one of predefined Magento templates and load its content for edit. To achieve this click the Template (3) dropdown, choose the necessary template from the list and click the “Load Template” (4) button below.


After that Template Subject (7) and Template Content (8) will be filled automatically and you will also see where this template is applied in the Currently Used For (5) row. Go through the code and edit the info to fit your needs. Then give a name for your custom template in the Template Name field. If it’s necessary you can also apply your custom CSS rules in Template Styles textarea and add unique design and fill for your template.


Once you finish with editing, you should now substitute the default Magento email template for a specific event with your recently created custom template. Look into Currently Used For field once again . This is the default config where the template is used. In our tutorial we used “New Account” template, so we need to navigate to Stores -> Configuration -> Customers -> Customer Configuration -> Create New Account Options -> Default Welcome Email section and apply our custom template. You can apply different templates to trigger the same event for different store views or make it available globally throughout your website.


Note: some email clients are set to not show emails built with HTML, so you may need to make the content of your email to be in plain text, so it will be visible to all your recipients. Click on the “Convert to Plain Text” (11) button to achieve this. After that all HTML tags from the email content will be removed.


2. Create custom template from the scratch

This method is much harder then the previous one and it requires strong knowledge of Magento email templates hierarchy, variables and HTML/CSS. It’s not suitable for beginners and it’s mostly used by the developers.

3. Override default email templates in the theme

You can also override default Magento templates in your theme. Depending on what download method you’ve used, location of default email templates may vary:

  • Download via Composser or Magento official site

In this case the path to default email template will be – ..\vendor\magento\{module}\view\frontend\email\email_template.html.

For example: ..\vendor\magento\module-sales\view\frontend\email\order_new.html.

  • Clonning the GitHub repo

In this case the path to default email template will be – ..\app\code\Magento\{namespace_module}\view\frontend\email\email_template.html.

For example: ..\app\code\Magento\Magento_Sales\view\frontend\email\order_new.html.

Storefront themes are conventionally located under ..\app\design\frontend\{company}\{theme} directory and you need to copy & pate the default email template into this folder, so the path will look like this – ..\app\design\frontend\{company}\{theme}\{namespace_module}\view\frontend\email\email_template.html.

For example: ..\app\design\frontend\MyCompany\MyTheme\Magento_Sales\view\frontend\email\order_new.html.

4. Insert Variables*

There is an option to “Insert variables” while you edit email template content. In Magento 2 there is a list of predefined variables that will be helpful to extend your email template with some additional info


The list is pretty limited but you can extend it with your own custom variables under the System -> Other Settings -> Custom Variables (11) section.


Note: The list of available variables depends on the template you use. The template-specific variables can be found in a ‹!–@vars @–› comment section at the top of each email template file. For example, look at app/code/Magento/Customer/view/frontend/email/account_new.html.

  • Some useful variables that can be used in emails:

Billing Address:

{{var formattedBillingAddress|raw}}

Shipping Address:

{{var formattedShippingAddress|raw}}

Shipping Description:

{{var order.getShippingDescription()}}

Email Order Note:

{{var order.getEmailCustomerNote()}}

Order ID:

{{var order.increment_id}}

Order Items Grid:

{{layout handle=”sales_email_order_items”order=$order area=”frontend”}}

Payment Details:

{{var payment_html|raw}}

In the end, preview your changes and save your template. Hope some of the info from this tutorial will be helpful for you.

The post How to Manage Custom Email Templates in Magento 2 appeared first on NWDthemes.com.

NWDthemes extensions and new GDPR policy compliance

$
0
0

Extensions and themes developed by NWDThemes company do not not collect any data from website visitors which makes them GDPR compliant. But please pay attention to these notes: if a user uses Google webfonts (which is pretty default) or shows a Youtube or Vimeo video via our slider, Google/Youtube/Vimeo may collect some information and the website owners need to add a notice about this in their privacy policy section.

1. External Sources

In case you’re using things like Google Web Fonts (default) or playing audio or video in your Slider Revolution or in your Essential Grid we recommend to add the corresponding text phrase to your privacy police:

Google Web Fonts

For uniform representation of fonts, this page uses web fonts provided by Google. When you open a page, your browser loads the required web fonts into your browser cache to display texts and fonts correctly.

For this purpose your browser has to establish a direct connection to Google servers. Google thus becomes aware that our web page was accessed via your IP address. The use of Google Web fonts is done in the interest of a uniform and attractive presentation of our plugin. This constitutes a justified interest pursuant to Art. 6 (1) (f) DSGVO.

If your browser does not support web fonts, a standard font is used by your computer.

Further information about handling user data, can be found at https://developers.google.com/fonts/faq and in Google’s privacy policy at https://www.google.com/policies/privacy/.

YouTube

Our website uses plugins from YouTube, which is operated by Google. The operator of the pages is YouTube LLC, 901 Cherry Ave., San Bruno, CA 94066, USA.

If you visit one of our pages featuring a YouTube plugin, a connection to the YouTube servers is established. Here the YouTube server is informed about which of our pages you have visited.

If you’re logged in to your YouTube account, YouTube allows you to associate your browsing behavior directly with your personal profile. You can prevent this by logging out of your YouTube account.

YouTube is used to help make our website appealing. This constitutes a justified interest pursuant to Art. 6 (1) (f) DSGVO.

Further information about handling user data, can be found in the data protection declaration of YouTube under https://www.google.de/intl/de/policies/privacy.

Vimeo

Our website uses features provided by the Vimeo video portal. This service is provided by Vimeo Inc., 555 West 18th Street, New York, New York 10011, USA.

If you visit one of our pages featuring a Vimeo plugin, a connection to the Vimeo servers is established. Here the Vimeo server is informed about which of our pages you have visited. In addition, Vimeo will receive your IP address. This also applies if you are not logged in to Vimeo when you visit our plugin or do not have a Vimeo account. The information is transmitted to a Vimeo server in the US, where it is stored.

If you are logged in to your Vimeo account, Vimeo allows you to associate your browsing behavior directly with your personal profile. You can prevent this by logging out of your Vimeo account.

For more information on how to handle user data, please refer to the Vimeo Privacy Policy at https://vimeo.com/privacy.

SoundCloud

On our pages, plugins of the SoundCloud social network (SoundCloud Limited, Berners House, 47-48 Berners Street, London W1T 3NF, UK) may be integrated. The SoundCloud plugins can be recognized by the SoundCloud logo on our site.

When you visit our site, a direct connection between your browser and the SoundCloud server is established via the plugin. This enables SoundCloud to receive information that you have visited our site from your IP address. If you click on the “Like” or “Share” buttons while you are logged into your SoundCloud account, you can link the content of our pages to your SoundCloud profile. This means that SoundCloud can associate visits to our pages with your user account. We would like to point out that, as the provider of these pages, we have no knowledge of the content of the data transmitted or how it will be used by SoundCloud. For more information on SoundCloud’s privacy policy, please go to https://soundcloud.com/pages/privacy.

If you do not want SoundCloud to associate your visit to our site with your SoundCloud account, please log out of your SoundCloud account.

2. Essential Grid Cookies

In case you’re using the “Cookie” feature in Essential Grid, EU Law requires that a notice be shown when Cookies are used. Here are free Cookie Notice Magento plugin you can use for this: https://github.com/valdecode/magento-cookielaw

The post NWDthemes extensions and new GDPR policy compliance appeared first on NWDthemes.com.

How to Style Email Templates in Magento 2

$
0
0

In a previous topic we have considered several ways on How to Create Custom Email Templates in Magento 2. In this article we’ll learn how to style them and make their look fit our project design most.

Some email clients like Gmail support CSS styles that have been applied as inline styles on the style attribute of HTML tags. Most of email styles are applied as inline styles because of this. Inline styling is provided by the Emogrifier library, that takes the HTML & CSS and adds all of the CSS styles to style attributes of the HTML tags.

  1. Inline Styles
  2. Non-inline Styles
  3. Override Styles

1. Inline Styles

If you open email template, for example /magento-email/view/frontend/email/header.html, you may notice the inlinecss directive in the next string:

{{inlinecss file="css/email-inline.css"}}

The directive tells Magento what file is applied as inline styles for current email template. Using the built-in Emogrifier tool the email template HTML will be automatically transmogrified by parsing CSS and inserting these CSS definitions into tags within email template HTML based on CSS selectors. By default CSS file can be found in pub/static/frontend/{Company}/{Theme}/{Locale}/css/ directory. In our case we are using default Magento theme CSS: pub/static/frontend/Magento/blank/en_US/css/email-inline.css. An example on how it works can be found below:

CSS rule from css/email-inline.css

.wrapper {
    margin: 20px auto;
}

HTML code from email/header.html

<table class="wrapper" width="100%">
    <!-- ... -->
</table>

The output source

<table class="wrapper" width="100%" style="margin: 20px auto;">
    <!-- ... -->
</table>

2. Non-inline Styles

Non-inline styles for emails come from global and template-specific styles, as described in the following sections.

  • Global styles

There are certain CSS styles that can’t be applied inline, for example media queries or :hover pseudo styles. These styles should be added in a head meta <style type=”text/css”></style> tag in order to work. We continue using the default Magento template /magento-email/view/frontend/email/header.html as an example. Now look for a css directive inside of a <style> tag:

{{css file="css/email.css"}}

It is also possible to use the relative module path for a CSS file like this:

{{css file="Magento_Sales::css/filename.css"}}

The directive compiles the contents of the css/email.css and outputs it further in a <style> tag of the email. The css/email.css file can be found in a pub/static/frontend/{Company}/{Theme}/{Locale}/css/ directory if you have deployed your static files. In our case we are using default Magento theme CSS: pub/static/frontend/Magento/blank/en_US/css/email.css. The related less file can be found in your current theme {Company}/{Theme}/{magento-module}/web/css/ directory. It works the next way:

For example, an email is being sent from a store configured with any Magento theme. The css directive first looks for an email.less file in {Magento-theme-module}/web/css. But if the file doesn’t exist there, it falls back to default {Magento_Blank_theme_dir}/web/css/email.less file. The contents of that file are compiled and its contents output in the <style> tag.

  • Template-specific styles

As mentioned earlier, the header.html file also outputs the template_styles variable:

{{var template_styles|raw}}

This is just the CSS code that you can inject into Template Styles (see a screenshot below) textarea that you can see in the admin area while managing email template directly. This part is applied on per template bases and it can be always different for every template.


3. Override Styles

It’s important to know how email styles are organized in Magento 2 and we strongly recommend to check this info prior you start overriding styles for Magento email templates.

So, after we already know how the styles works, we can now override them. To achieve this you should follow the next steps:

  • Create your own .less based on default Magento file. The default .less file can be found in {magento-module}/web/css directory.
  • The file should be placed into {Company}/{Theme}/{magento-module}/web/css/source directory.
  • The file name should start with “_” and then the name of the file we override from current module e.g. _email.less. In case we need to override styles for all templates at the same time the file name should end with the word “-extend” e.g. _email-extend.less (default: email.less).
  • Add your own styles into your .less file.
  • Фfter you finish re-deploy the content using the next command in your console:
    php bin/magento setup:static-content:deploy -f

Our custom _email-extend.less will be included after compilation of both email.less and email-inline.less files. All styles, except styles in mixins like .email-non-inline() and .media-width(), will be added as inline styles.

The post How to Style Email Templates in Magento 2 appeared first on NWDthemes.com.

How to disable module in Magento 2

$
0
0

There are 3 ways to disable module in Magento 2. Well, actually 3rd way only disable module output, but it can be done directly from admin.
Disable module via command line
Disable module manually
Disable module output
Uninstall module completely

Disable module via command line

Magento 2 has powerful build-in command line tool to perform various tasks. To disable module in ssh console type

> php bin/magento module:disable Nwdthemes_ArraySerialized

The following modules have been disabled:
- Nwdthemes_ArraySerialized

Cache cleared successfully.
Generated classes cleared successfully. Please run the 'setup:di:compile' command to generate classes.
Info: Some modules might require static view files to be cleared. To do this, run 'module:disable' with the --clear-static-content option to clear them.

Some modules in magento depends on other modules. In this case you get a warning with a list of dependent modules

> php bin/magento module:disable Magento_Config
Unable to change status of modules because of the following constraints:
Cannot disable Magento_Config because modules depend on it:
Magento_Store: Magento_Store->Magento_Config
Magento_AdvancedPricingImportExport: Magento_AdvancedPricingImportExport->Magento_Store->Magento_Config
Magento_Directory: Magento_Directory->Magento_Config
Magento_Theme: Magento_Theme->Magento_Config
Magento_Backend: Magento_Backend->Magento_Config
Magento_Backup: Magento_Backup->Magento_Store->Magento_Config
...
...

You can still disable the module in this case with help of [-f|--force] flag. Be aware that your store might not function properly in this case!!!

> php bin/magento module:disable -f Magento_Config

Complete list of module commands commands are:

Disable module manually

You can disable module in Magento 2 manually. Open /app/etc/config.php. It could look like

<?php
return array (
  'modules' => 
  array (
    'Magento_Store' => 1,
    'Magento_AdvancedPricingImportExport' => 1,
    'Magento_Directory' => 1,
    'Magento_Theme' => 1,
    'Magento_Backend' => 1,
    'Magento_Backup' => 1,
	...
    'Magento_Wishlist' => 1,
    'Nwdthemes_ArraySerialized' => 1,
  ),
);

To disable module you need to set its value to 0.
'Nwdthemes_ArraySerialized' => 1, >>> 'Nwdthemes_ArraySerialized' => 0,.
This method is not recommended to use since config.php generated automatically during setup:upgrade routine.

Disable module output

You can disable module output in magento admin. This is suitable if you pretty sure that error comes from one of module blocks and you do not have access to ssh console. However, in this case module still active and if it has any events / plugins etc they still will be executed.

Navigate to Stores > Configuration > Advanced > Disable module output. Scroll to module, select “Disable” in dropdown next to module name and click “Save Config”. Last step is to clear / flush store cache.

Uninstall module completely

If you want to uninstall module completely – check our Magento 2: How to uninstall module tutorial.

The post How to disable module in Magento 2 appeared first on NWDthemes.com.

How to install magento 2 module from github using composer

$
0
0

Install magento 2 module from github using composer is pretty simple. We assume that you already has git and composer installed on your system. Let’s take magento2-configuration-arrayserialized as an example. Complete commands list are:

composer config repositories.elpas0-magento2-configuration-arrayserialized git git@github.com:elpas0/magento2-configuration-arrayserialized.git
composer require elpas0/magento2-configuration-arrayserialized dev-master
php bin/magento setup:upgrade
php bin/magento setup:static-content:deploy
php bin/magento cache:clean

Explanation

Register the repository

composer config repositories.elpas0-magento2-configuration-arrayserialized git git@github.com:elpas0/magento2-configuration-arrayserialized.git

First we add our repository to project composer.json file. Command syntax

composer config repositories.  

It will add our repository to repositories section of magento json file. Updated section looks like

"repositories": {
        "0": {
            "type": "composer",
            "url": "https://repo.magento.com/"
        },
        "elpas0-magento2-configuration-arrayserialized": {
            "type": "git",
            "url": "git@github.com:elpas0/magento2-configuration-arrayserialized.git"
        }
    },

More information about composer config command can be found here – https://getcomposer.org/doc/03-cli.md#config

Download module files

composer require elpas0/magento2-configuration-arrayserialized dev-master

It will register module in require section of composer.json and download the files from repository

Module installation

php bin/magento setup:upgradeUpgrades the Magento application, DB data, and schema
php bin/magento setup:static-content:deployDeploys static view files
php bin/magento cache:cleanCleans cache type(s)

Quick links

Magento 2: How to disable module
Magento 2: How to uninstall module
Magento 2 Command-Line Interface (CLI) Commands List

The post How to install magento 2 module from github using composer appeared first on NWDthemes.com.


How to Add Product Video in Magento 2

$
0
0

Nowadays it’s hard to imaging a good product details page without a video. Watching these videos makes a truly overview of your products before purchasing that will bring even more sales by your clients. Luckily, there is built-in functionality to add product video in magento 2. It’s possible to achieve this in 3 simple steps: get an API Key from your Google account, enter it in the configuration of your store and finally link the product the video.

  1. Get Your YouTube API Key
  2. Configure Magento
  3. Link to the Video

1. Get Your YouTube API Key

The first step will be to login in to your Google account and navigate to Google Developers Console.

  • In the search field type “YouTube Data API v3” or find this block by scrolling down the page.
  • Click this block and then Enable the API.
  • After that you will be redirected to a Manage APIs page where you should apply your credentials.
  • In the panel on the left choose Credentials, expand the “Add Credentials” menu and choose API key.
  • When prompted to create a new key, choose Server key, enter a name for it and click the Create button.
  • After a while a new key will be generated and once it’s done copy this key to the clipboard.

2. Configure Magento

The next step is to apply the API key in Magento settings.

  • Login to Magento admin panel and navigate to Stores -> Configuration (1) section.


  • Under the Catalog -> Catalog -> Product Video (2) block paste your YouTube API Key (3) saved before.


  • Click the “Save Config” button.

The final step is to link our products to the necessary YouTube videos.

  • Open to edit your product.
  • Scroll down to the Images and Videos (1) section and click the “Add Video” (2) button on the right.


  • Fill in all required fields marked with “*”. Here you can also retrieve the video meta data that is stored on the host server. Use the original data, or update it as needed.
  • Save the changes once you finish (3).


That’s all, you can now apply YouTube videos for your products. As for the Vimeo videos the process is much easier and all you need is to apply video URL as shown at the latest screenshot while managing a product without configuring any APIs.

The post How to Add Product Video in Magento 2 appeared first on NWDthemes.com.

Magento 2 SEO tips

$
0
0

Magento 2 is a great open-source ecommerce platform. It has wide variety of features, gives you full control on design, has large community and so on. But most important nowadays is that Magento is one of the most search engine friendly e-commerce platforms. Many store owners do not use all its power due to a laсk of knowledge or laсk of time. But if you are looking to increase revenues and site visitors, you need to check our magento 2 seo tips on how to take advantage of Magento 2 seo features available out-of-the-box!

Magento 2 SEO tips

List include both off-page and on-page tips. We will try to cover all bottle-neck places so you can be sure in your store.

Site speed

Search engines love fast sites. Page load speed is used in ranking algorithms. But moreover, customers love fast sites. Nobody wants to wait. A slow store webpage might being closed before it even had a chance to show how good it is. Some of the most important tips to increase magento 2 store load speed are:

  • choose the fastest hosting you can afford. Magento 2 hosting requirements can be checked here
  • use production mode for a live site
  • enable cache in System > Cache Management
  • enable js/css minification ( Stores > Configuration > Advanced > Developer )
  • use CDN for static content
  • pay attention to 3rd-party extensions are you using. Some might have great influence on your performace

Domain name and HTTPS

  • If you do use both www.domain.com and domain.com you need to set preferred domain name in Google Webmaster Tools. The preferred domain is the one that you would liked used to index your site’s pages.
  • Use HTTPS. It is more secure, your customers feel more secure. It is also a ranking signal for search engines.

Duplicated content

Duplicated content is one of the most important SEO issue affecting magento stores. In most cases duplicates occur because of product filtering, sorting and pagination. Another common case is same product in different categories and variation of the same product.

  • Disable Use Categories Path for Product URLs. Optimally you should only use top-level URLs, meaning don’t include the category in the path. Edit this option for your website under: Stores > Configuration > Catalog > Search Engine Optimization
  • Enable Use Canonical Link Meta Tag For Categories. It means that canonical URLs are applied to sorted and filtered pages

magento 2 disable category path for product url

Google Webmaster Tools and Analytics

Set up Google Search Console (Google Webmaster Tools) and Google Analytics. With Google Search Console, you can monitor and track your site’s search performance, doing so can help you understand how Google views your site. Google Analytics is one of the best services to track data about visitors on your site.

Product Image Optimization

  • Add ALT text to product images. It is really good habit which improve your site accessibility. Google places a relatively high value on alt text to determine not only what is on the image but also the topic of the surrounding text. You can do it on product edit page in Images And Videos section.
  • Optimize the images itself. Product page with too heavy images will take longer to load. Page speed is important for both search engines and customers. There are a number of ways to do it – directly on your server or using 3rd-party service like TinyPNG.

Magento Configuration

These steps can be done via magento backend.

  • ALT text for your logo. It can be done in Content > Design> Configuration > Header
  • Add xml sitemap and adjust your robots.txt. Check magento documentation for details
  • SEO-friendly url for product. Product url key could be specified on product edit page in Search Engine Optimization section
  • Dont use default descriptions. Use unique Meta data for categories.
  • Unique Meta data for cms pages ( including HOME page ). It can be done in Content > Pages > Home Page > Search Engine Optimisation

Additional steps

  • Add share button. It will allow your customer to share a product across different social platforms like Faceook, Twitter and Instagram
  • Consider creating a blog on your site. Well-written post can drive a lot of traffic to your site.
  • Add Q&A section to your site. User-generated content are great for attracting visitors.
  • Use Video on product pages. Rich-media content is the best to show product benefits.

The post Magento 2 SEO tips appeared first on NWDthemes.com.

Magento Essential Grid 2.2.5 Released

$
0
0

Today we have released version 2.2.5 of Magento Essential Grid extension – best tool for creating product, images or any kind of listings and presenting it to customer in exciting eye catching grid with stunning animation and hover effects.

In new version of Magento Essential Grid extension we have improved products quality and added some new features to help you in making your Magento store better and increasing your sales.

Let’s take a quick tour on new features of Magento Essential Grid extension.

We have added YouTube no cookie url option so you can use YouTube videos and follow GDPR Policy

Added options to use more icon fonts – Font Awesome and PE Stroke 7 for you to have more freedom iconizing your items and buttons.

Now you have control over product based grid to include or exclude out of stock products to be more flexible in creating product lists.

At least we have fixed add bulk images feature in custom grids so now you can add any number of items there just with few clicks.

And we remember that mobile traffic is the king. So we have added feature to convert inline filters to dropdowns on mobile – this will increase usability of your store for mobile users for sure.

We all love Instagram! So we have updated Instagram stream based gids to give you even more options there. Want to have grid from mixed search results or from multiple accounts? Not a problem anymore. New version of Magento Essential Grid extension can do it and you have to try it!

Lightbox have resigned! Now we have new FancyBox 3 for images preview and it have a lot of cool features: zoom/pan images, button options, new content display animations and of cause improved mobile display and mobile usability!

Here you can check full list of updates in version 2.2.5 of Magento Essential Grid extension:

New Features:

  • Added Global Option for usage YouTube NoCookie URLs
  • Added the ability disable the initial “start” animation
  • Added new “start” animation options
  • Added new option to animate the grid when scrolled it’s into view
  • Added new option to convert inline filters to dropdown on mobile
  • Upgraded default Lightbox to FancyBox 3 which include:
    • Ability to display a Slider Revolution, Essential Grid, SoundCloud & iFrame
    • Improved Mobile Display and Mobile Usability
    • Deep Linking for sharing Lightbox content
    • Ability to zoom/pan images at their original size
    • New button option to allow for image downloads
    • New content display animations
  • Upgraded Instagram Integration:
    • Added new Instagram Searches Tag(s), Location/Places
    • Added new Instagram Mix Search Results
    • Added new Instagram possibility to add multiple users, tags, places
    • Added new optional Icon Fonts Font-Awesome, PE Stroke 7
  • Added funtionality to complete the sentence in the excerpt/content after x minumum words
  • Added share links for Facebook, Twitter, Google Plus and Pinterest (Skin Editor)
  • Added Featured Grid Meta Option to replace the Featured Image of Posts with an Essential Grid
  • Added Filter Deeplinking Functionality (https://page_with_essgrid_url#filter_slug)
  • Added “No Filter Match” Text Global Option
  • Added Max Products in Preview option for large blogs
  • Added Button to find downloadable skins in Import/Export page
  • Added option to include or exclude out of stock products in product based grid

Changes:

  • Reorganized custom grid item dialog for better usability
  • “Hide markups before load” option is now deprecated
  • Start and filter animation options are now separated
  • Improved “esskill” API cleanup
  • Media Filters can now be turned off to clean up the backend (via Global Settings)
  • String links in Social Stream Contents are now converted to real HTML links
  • Icon Font loading is now optional
  • FullScreen button added to embedded YouTube videos
  • Not usable Filter/Search fields not in the frontend output (for Stream and Gallery sources)
  • Not usable Filter/Search fields not in the backend “Available Modules” (for Stream and Gallery sources)
  • Removed admin page redirect on new grid creation
  • Moved admin/images controller to admin/esgimages controller

Bugfixes:

  • Fixed “Overwrite Existing” option for imported grids
  • Fixed Layers missing for split items with video
  • Fixed issue with Cookies when multiple grids are used
  • Fixed custom meta not working as navigation filters
  • Multi-select custom meta now sanitized for navigation filters
  • Fixed alternative image size issue for lightbox
  • Fixed Pagination Arrows for multiple grids
  • Fixed “Content Push” option not working in some cases
  • Fixed Facebook Stream lightbox image sizing
  • Fixed lightbox preview
  • Adapted to new Instagram API result format
  • Fixed Lightbox Post Content special character issue
  • Fixed “TypeError: e.container.find(…).esgbox is not a function”
  • Fixed Lightbox “Content Gallery” option
  • Fixed Grid Creation Ajax Error message upon multiple save
  • Fixed older PHP compatability (“Fatal Error” messages)
  • Fixed HTML5 Audio source compatibility for Safari
  • Fixed Disable Lightbox option in Global Settings
  • Fixed missing essgrid_get_posts filter
  • Fixed Limited Custom Grid Items
  • Fixed Twitter image / text issues with extended tweets
  • Fixed Instagram dates displaying current system date instead of photo creation date
  • Fixed links over layers getting broken when HTML Link was inside this layer’s content
  • Removed create_function() calls to gain compatibility with latest PHP version
  • Fixed issue with mailto links in Meta fields
  • Fixed Video Media Poster fetching non-https images
  • Fixed Custom CSS class names for skins
  • Fixed some imported grids missing a default source type
  • Fixed double-lightbox issue
  • Fixed hover animation for McKinley and Taft skins
  • Fixed Instagram Title issue
  • Fixed Skin Editor Styling issue
  • Fixed Color Picker Styling issue
  • Fixed Load More feature on front end
  • Fixed preview of product based grids in admin panel
  • Fixed bug with default sorting by price
  • Fixed problem with display of loading animation when filtering items
  • Fixed custom grid images display with http protocol on front end
  • Fixed adding bulk images to Custom Grid
  • Fixed images url in multistore installation

We have done lot of updates in this version and will be working on doing more. And what we love more than releasing quality Magento extensions? To hear your feedback and proposals of making them even greater!

The post Magento Essential Grid 2.2.5 Released appeared first on NWDthemes.com.

Magento 2: Working with ArraySerialized backend model

$
0
0
Complete module code can be found on github.
Ready-to-paste package – magento2_configuration_arrayserialized.zip.
Installation instructions

Magento 2 ArraySerialized is backend model used to store configuration data ( dynamic settings array ) in serialized state in one field. It extends \Magento\Config\Model\Config\Backend\Serialized model and has two basic methods:

beforeSave serializes data before saving, as a result options converted to a string and can be stored in a single field in the database

/**
     * @return $this
     */
    public function beforeSave()
    {
        if (is_array($this->getValue())) {
            $this->setValue($this->serializer->serialize($this->getValue()));
        }
        parent::beforeSave();
        return $this;
    }

_afterLoad unserialize value before return it to caller.

/**
     * @return void
     */
    protected function _afterLoad()
    {
        $value = $this->getValue();
        if (!is_array($value)) {
            $this->setValue(empty($value) ? false : $this->serializer->unserialize($value));
        }
    }

Magento 2.0.x and Magento 2.1.x use default PHP serialize functionality. Starting from Magento 2.2.x it uses the JSON format by default.

Implementation

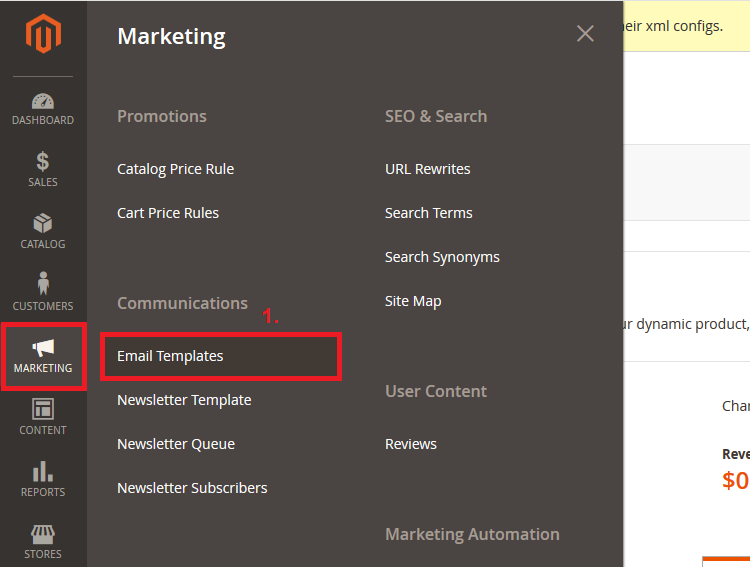
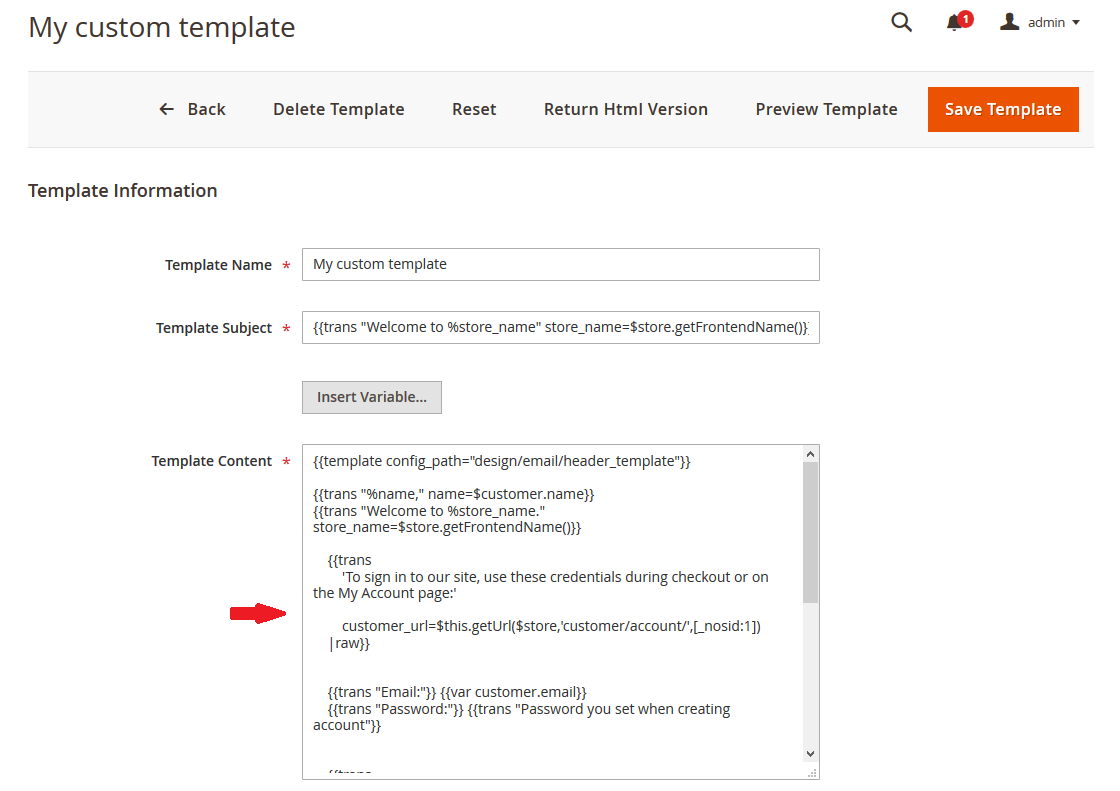
Dynamic settings in system configuration is really cozy when you don’t know exact number of parameters. Here is sample screenshot from Magento 2 Product Slider extension by NWDthemes. It allows you to control number of items in slider for certain screen width. You can add and delete options according to your needs.

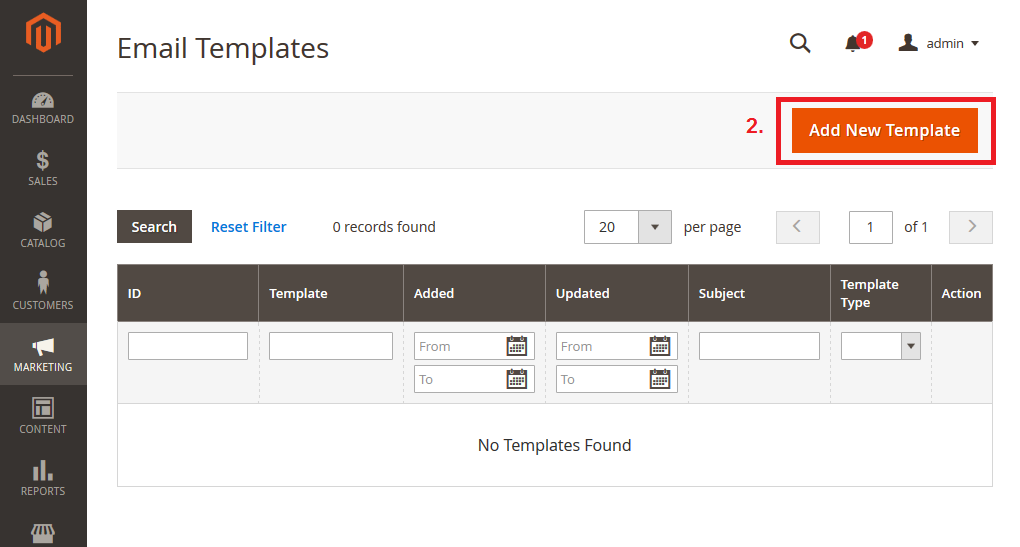
1. Add new field in /etc/adminhtml/system.xml.

<field id="responsiveItems" translate="label" sortOrder="10" showInDefault="1" showInWebsite="1" showInStore="1">
    <label>Responsive Items</label>
    <frontend_model>Nwdthemes\ArraySerialized\Block\Adminhtml\Form\Field\ResponsiveItems</frontend_model>
    <backend_model>Magento\Config\Model\Config\Backend\Serialized\ArraySerialized</backend_model>
    <comment>Object containing responsive options. Breakpoint set screen width and item set number of items visible starting from breakpoint width</comment>
</field>

It use ArraySerialized as backend model.

2. Create frontend model Block/Adminhtml/Form/Field/ResponsiveItems.php. We use text field for sample, but it can be any html element like checkbox, dropdown, radio button etc.

<?php

namespace Nwdthemes\ArraySerialized\Block\Adminhtml\Form\Field;

use Magento\Config\Block\System\Config\Form\Field\FieldArray\AbstractFieldArray;

/**
 * Class ResponsiveItems
 */
class ResponsiveItems extends AbstractFieldArray
{
    /**
     * {@inheritdoc}
     */
    protected function _prepareToRender()
    {
        $this->addColumn('breakpoint', ['label' => __('Breakpoint ( in px )'), 'class' => 'required-entry']);
        $this->addColumn('items', ['label' => __('Items'), 'class' => 'required-entry']);
        $this->_addAfter = false;
        $this->_addButtonLabel = __('Add Breakpoint');
    }
}

$this->addColumn() add columns to settings array. Function take two params:

  1. $name – define column name
  2. $params – column parameters array. Possible parameters are:
    • ‘label’
    • ‘size’
    • ‘style’
    • ‘class’
    • ‘renderer’

Thats it. Clear cache if enabled and you can see new field in magento admin.

Default values for system configuration

Usually default values for configuration set in etc/config.xml. But it does not work with ArraySerialized in Magento 2.0.x – 2.1.x. Check this issue on github for details. To resolve it we will use Setup/InstallData.php. Data setup used to insert default module data into database. Attributes that come with Magento by default, 404 and other Cms pages are all examples of data setup.

How data stored in database

Magento 2.0.x – 2.1.x use default PHP serialize functionality.

a:4:{s:17:"_1528879546018_18";a:2:{s:10:"breakpoint";s:1:"0";s:5:"items";s:1:"1";}s:18:"_1528879546554_554";a:2:{s:10:"breakpoint";s:3:"480";s:5:"items";s:1:"2";}s:17:"_1528879547050_50";a:2:{s:10:"breakpoint";s:3:"768";s:5:"items";s:1:"3";}s:18:"_1528879555818_818";a:2:{s:10:"breakpoint";s:4:"1024";s:5:"items";s:1:"5";}}

Magento 2.2.x use the JSON format by default.

{"_1528878332307_307":{"breakpoint":"0","items":"1"},"_1528878332987_987":{"breakpoint":"480","items":"2"},"_1528878338219_219":{"breakpoint":"768","items":"3"},"_1528878340675_675":{"breakpoint":"1024","items":"5"}}

Array keys like _1528879546018_18 generated by magento when you add new option to your dynamic settings. Its purpose is just to generate unique element ID. Javascript code that add new row use time and milliseconds to generate it. We will use this info to generate default value.

add: function(rowData, insertAfterId) {
	// generate default template data
	var templateValues;

	// Prepare template values
	if (rowData) {
		templateValues = rowData;
	} else {
		var d = new Date();
		templateValues = {
			breakpoint: '',
			'option_extra_attrs': {},
			items: '',
			'option_extra_attrs': {},
			_id: '_' + d.getTime() + '_' + d.getMilliseconds()
	};
}

Add default value

<?php

namespace Nwdthemes\ArraySerialized\Setup;

use Magento\Framework\Setup\InstallDataInterface;
use Magento\Framework\Setup\ModuleContextInterface;
use Magento\Framework\Setup\ModuleDataSetupInterface;

/**
 * @codeCoverageIgnore
 */
class InstallData implements InstallDataInterface
{
    /**
     * Config factory
     * @var \Magento\Config\Model\Config\Factory
     */
    private $configFactory;

    /**
     * Init
     *
     * @param \Magento\Config\Model\Config\Factory $configFactory
     * @param \Magento\Framework\App\State $state
     */
    public function __construct(
        \Magento\Config\Model\Config\Factory $configFactory,
        \Magento\Framework\App\State $state
    )
    {
        $this->configFactory = $configFactory;
        $state->setAreaCode('adminhtml');
    }

    /**
     * {@inheritdoc}
     * @SuppressWarnings(PHPMD.ExcessiveMethodLength)
     */
    public function install(ModuleDataSetupInterface $setup, ModuleContextInterface $context)
    {
        $index = time();
        $configData = [
            'section' => 'nwdarrayserialized',
            'website' => null,
            'store'   => null,
            'groups'  => [
                'general' => [
                    'fields' => [
                        'responsiveItems' => [
                            'value' => array(
                                $index.'_0' => array("breakpoint" => "0", "items" => "1"),
                                $index.'_1' => array("breakpoint" => "480", "items" => "2"),
                                $index.'_2' => array("breakpoint" => "768", "items" => "3"),
                                $index.'_3' => array("breakpoint" => "1024", "items" => "5"),
                            ),
                        ],
                    ],
                ],
            ],
        ];

        /** @var \Magento\Config\Model\Config $configModel */
        $configModel = $this->configFactory->create(['data' => $configData]);
        $configModel->save();
    }

}

$state->setAreaCode('adminhtml'); line in constructor set store area. Area is not set in Magento CLI (it is not required for any core commands). When you try to run setup:upgrade without the area you will get the error:

[Magento\Framework\Exception\SessionException] Area code not set: Area code must be set before starting a session.

[Magento\Framework\Exception\LocalizedException] Area code is not set

Data script use \Magento\Config\Model\Config model to save default value. We pass array to the model, but it needs to be serialized before save. Config model check if field has backend model and use it for data processing. Check Mage2.PRO for complete code flow of how magento 2 save a backend config form vield value.

Starting from magento 2.2.4 you should be able to set default value directly in etc/config.xml. Check this commit for a fix and usage sample.

<config xmlns:xsi="http://www.w3.org/2001/XMLSchema-instance" xsi:noNamespaceSchemaLocation="urn:magento:module:Magento_Store:etc/config.xsd">
    <default>
        <test_section>
            <test_group>
                 <test_field_serialized backend_model="Magento\Config\Model\Config\Backend\Serialized">["value1","value2"]</test_field_serialized>
            </test_group>
        </test_section>
    </default>
</config>

Using dynamic settings in your models / blocks / templates

To use dynamic settings in module we will create a helper.

<?php

namespace Nwdthemes\ArraySerialized\Helper;

use Magento\Framework\App\ObjectManager;

/**
 * ArraySerialized helper
 */
class Data extends \Magento\Framework\App\Helper\AbstractHelper
{
    /**
     * Get config value
     * @param $configPath
     * @param null $store
     * @return mixed
     */
    public function getConfigValue($configPath, $store = null)
    {
        return $this->scopeConfig->getValue(
            $configPath,
            \Magento\Store\Model\ScopeInterface::SCOPE_STORE,
            $store
        );
    }

    /**
     * Get serialized config value
     * temporarily solution to get unserialized config value
     * should be deprecated in 2.3.x
     *
     * @param $configPath
     * @param null $store
     * @return mixed
     */
    public function getSerializedConfigValue($configPath, $store = null)
    {
        $value = $this->getConfigValue($configPath, $store);

        if (empty($value)) return false;

        if ($this->isSerialized($value)) {
            $unserializer = ObjectManager::getInstance()->get(\Magento\Framework\Unserialize\Unserialize::class);
        } else {
            $unserializer = ObjectManager::getInstance()->get(\Magento\Framework\Serialize\Serializer\Json::class);
        }

        return $unserializer->unserialize($value);
    }

    /**
     * Check if value is a serialized string
     *
     * @param string $value
     * @return boolean
     */
    private function isSerialized($value)
    {
        return (boolean) preg_match('/^((s|i|d|b|a|O|C):|N;)/', $value);
    }

}

public function getConfigValue() used to load any value from config table.
public function getSerializedConfigValue() is modified to automatically unserialize config data. It detect if we have serialized string or json string and use proper method to unserialize data. This code works in both 2.0.x – 2.1.x and 2.2.x versions. Starting from 2.2.4 it should be enough to use just public function getConfigValue().

Sample block to illustrate helper usage.

<?php

namespace Nwdthemes\ArraySerialized\Block;

use Magento\Framework\View\Element\Template;

class Sample extends Template
{
    /**
     * @var \Nwdthemes\ArraySerialized\Helper\Data
     */
    protected $helper;

    /**
     * @param Template\Context $context
     * @param \Nwdthemes\ArraySerialized\Helper\Data $helper
     * @param array $data
     */
    public function __construct(Template\Context $context, \Nwdthemes\ArraySerialized\Helper\Data $helper, array $data = [])
    {
        $this->helper = $helper;
        parent::__construct($context, $data);
    }

    /**
     * Return string with json configuration
     *
     * @return string
     */
    public function getArraySerialized()
    {
        $responsiveItems = $this->helper->getSerializedConfigValue('nwdarrayserialized/general/responsiveItems');
        //process value according to your needs...
        return json_encode($responsiveItems);
    }
}

We inject helper in block constructor and use it to grab the data from configuration. Complete module code can be found on github.

Installation

Install via composer (recommend)

Run the following command in Magento 2 root folder:

composer require elpas0/magento2-configuration-arrayserialized
php bin/magento setup:upgrade
php bin/magento setup:static-content:deploy
php bin/magento cache:clean

Check this article if you have for details – install magento 2 module using github

Install ready-to-paste package

Uninstallation

Magento 2: How to disable module
Magento 2: How to uninstall module

The post Magento 2: Working with ArraySerialized backend model appeared first on NWDthemes.com.

Magento 2 Email Templates Extension

$
0
0

Email is a very important part of interaction with clients and potential customers in e-commerce business. And every appeal to the client should reflect your brand. This is why it is extremely required to keep all your emails well designed and be consistent with your brand guidelines.

Magento 2 provides rich features to manage email templates for all outcoming emails. But to work with them you need advanced knowledge of Magento 2 structure and techniques to override default emails (link to our article). Plus of cause it will require HTML and LESS/CSS skills.

So how do you make your emails look solid and do good sales without spending lot of time diving into specifics of Magento 2 engine? Good news – we have solution for you! Magento 2 Email Templates extension – is only tool you need to quickly and effectively change design of all and any emails in your online store.

It comes with pack of perfect hand crafted pre-designed blocks to create template for your emails. Plus it have powerful drag-and-drop based editor with advanced features like HTML editor for more skilled users.

Main Features

Change email template design globally

With this feature you can assign design to all outbound emails in your store with few clicks. This is real time saver. You don’t have to go through all email templates to adjust design – instead you only have to edit one global email template that is applied to all emails. You can modify this template and all changes will immediately affect all store emails. And you can quickly change it to different email template for any special occasion.

Change design of specific email templates

If you need you can assign email template design to any specific email in your store to make it look different. You can easily find configs for email that have to be changed using list of all Magento email templates configurations gathered on Templates Overview page.

Change design of newsletter email templates

Newsletter emails are so important in generating new sales. That’s why we have feature to change design of newsletter email templates. Just select one of our editable email templates and it will be applied to all of newsletter email templates.

Library of email template blocks designs

When editing or creating new email templates you can choose from number of pre-designed headers, footers and content blocks and then edit them to fit your needs.

Visual email template editor with drag and drop and HTML code edit features

Editing email templates is user friendly and intuitive with drag and drop interface. And for users with HTML skills we have options to edit HTML code of email templates as well to give you full control over email templates content.

Email template preview

Of cause you want to know how your emails will look like before sending them out. So we have preview feature in template editor to check out exact look of how your emails will be seen by recipients.

Send email template preview to email

Best way to see how your email will look is to see it in inbox of your mail application. You have this ability with send email template preview to email feature. Just click and enter your email and check your inbox for email template preview.

All Magento email templates configs on one page

There are lot of email templates in Magento 2 that could be configured. Sometimes it can take some time to find where is this config is located in Magento 2 configuration. In our application we gathered all of them for you and placed on single page. Now you can quickly access template configuration of every email template in your store.

Add and edit email templates

You can create any amount of email templates to suite all your needs. Like to have email templates specially decorated for every holiday or campaign. Edit them with handy email template editor to add all information you want to share with subscribers of your online store.

Compatible with all modern browsers

Our email templates are tested and compatible with all modern browsers. You can be sure email templates designs will look good on all platforms.

Email clients friendly

Email templates coding is confirmed to look good in modern email clients. Your clients will be able to read your emails not depending of what email application they are using.

Responsive emails design

A lot of your clients and subscribers will read your emails on mobile or tablet devices. And it is very important for your emails to look good there. Our email templates are responsive so they will fit any device size perfectly.

Friendly Professional Support

If you will have any question or problem with our product our team will help you to resolve any of that. And we are always open to suggestions regarding new features and custom works requests to make this product fit needs of your online business.

New designs updates

You will get even more fresh designs for your emails with regular updates of this extension.

If you liked our Magento 2 Email Templates extension and found it helpful for your online business you definitely have to try other our Magento 2 extensions like Product Slider or Power Banners.

The post Magento 2 Email Templates Extension appeared first on NWDthemes.com.

Viewing all 53 articles
Browse latest View live